
This post may include affiliate links; for details, see our disclosure policy.
This Hasselback potatoes recipe makes baked potatoes with a fan of thin, crispy slices. It’s a side dish to impress!

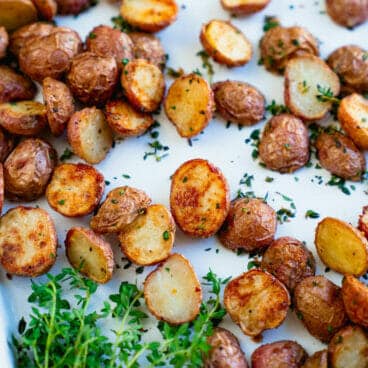
Here’s a side dish that impresses every time: Hasselback Potatoes! This popular way to prepare the ubiquitous spud tastes just as good as it looks. Slice a whole potato into thin strips, then bake until the slices separate and form crispy, roasted slices. It’s a whole new way to love a potato! It takes a little effort to prepare, but it’s absolutely worth it for a stunning side dish. Here’s how to make this fun and tasty potato recipe!
Ingredients for Hasselback potatoes
Hasselback potatoes are baked potatoes cut into fans of thin strips, connected at the bottom. Once the potatoes bake, the slices become crispy and separate. Why are they called Hasselback potatoes? The dish was popularized in the 1950’s by a restaurant in Stockholm, Sweden called Hasselbacken. However, there are some earlier references to the dish (like in a 1929 cookbook) that indicate it may have originated elsewhere. Whatever the case, we owe this concept to the Swedes!
While it takes a bit of time to cut Hasselback potatoes, the ingredients are simple. Here’s what you’ll need for this recipe:
- Medium russet potatoes (12 to 13-ounces each)
- Olive oil
- Salt
- Butter
- Garlic
- Italian seasoning
- Parsley or chives, for garnish

Types of potatoes
We chose russet potatoes for this Hasselback potatoes recipe. This variety is also called a starchy potato, the type you’d use for a classic baked potato or mashed potatoes. We used potatoes that were 12 to 13 ounces each, which is medium large. However, you can use other varieties and sizes with this technique as well.
Yukon gold or red potatoes work too! These are called waxy potatoes, and are often used for roasting, fries, and so forth. They hold their shape more when baked or roasted. You may need to adjust the roasting time if you use other varieties of potato: and especially if they are smaller than those specified in the recipe!

How to cut Hasselback potatoes
Here’s the big question: how do you cut Hasselback potatoes? These lovely thin slices look like they were made with a special cutting device: and there actually is such a thing! If you make Hasselback potatoes often, you might want to invest in the special potato cutter. If not, all you need are a pair of chopsticks or a similar item: pencils, wooden spoons, etc. Here’s what to do:
- Place two chopsticks along the sides of a potato. These will act as guides to prevent cutting all the way through.
- Slice the potato into 1/8th-inch slices, being careful not to go all the way through to the bottom using the guides.
- Pay special attention to the ends of the potatoes that need a shallow cut: the guides won’t help here! Repeat for each potato.
A few notes on bake time
This Hasselback potatoes recipe indicates to bake the potatoes for 1 hour and 15 minutes total, removing them from the oven once after 1 hour to brush with olive oil again and add salt. Here are a few notes on baking:
- Adjust the bake time if you have smaller potatoes or use a different variety. The main thing you’re looking for is for the potato to be fully tender and cooked through, with crispy slices that have started to separate.
- Add more oil and salt once the slices are separated. The initial bake time of 1 hour should work for most 12 ounce potatoes. But if your potatoes are smaller, check them at 45 minutes or so.
- Bake again, then brush with garlic butter. We found the best way to infuse flavor into Hasselback potatoes is to end with garlic butter and flaky salt so they taste beautifully flavorful. It’s hard to get into all the cracks and crevaces, so seasoning at the end is important.

Topping ideas
Want to add more toppings to these Hasselback potatoes? They taste incredible as is with the garlic butter, making them ideal for dinner parties or for a Thanksgiving side dish. Or, you can add more toppings as you like. Here are a few tasty ideas:
- Grated Parmesan cheese (add in the last 10 minutes)
- Sour cream
- Sliced green onions
- Cheddar cheese (add in the last 10 to 15 minutes)
- Bacon
- Chimichurri sauce
- Ranch dressing
What do you plan to top these potatoes with? Let us know in the comments below.

More potato recipes
Potatoes are one of the most popular vegetables when it comes to side dishes! Here are some more favorite potato recipes for your inspiration:
- Go for Classic Roasted Potatoes
- Try Parmesan Potato Wedges
- Opt for Ultimate Baked French Fries or Easy Steak Fries
- Grab a Classic Baked Potato
- Cook up a pot of Loaded Potato Soup or a bowl of Classic Potato Salad


This Hasselback potatoes recipe is…
Vegetarian and gluten-free. For vegan and dairy-free, use vegan butter.

Hasselback Potatoes
- Prep Time: 15 minutes
- Cook Time: 1 hour 15 minutes
- Total Time: 1 hour 30 minutes
- Yield: 6 1x
Description
This Hasselback potatoes recipe makes baked potatoes with a fan of thin, crispy slices. It’s a side dish to impress!
Ingredients
- 6 medium russet potatoes (12 to 13-ounces each)
- 2 tablespoons olive oil
- ¾ teaspoon kosher salt
- 3 tablespoons salted butter (or vegan butter)
- 1 garlic clove, grated
- ½ teaspoon Italian seasoning
- Flaky sea salt, for garnishing
- 1 tablespoon finely chopped parsley or chives, for garnishing
- Other toppings, as desired (sour cream, cheese, green onions, bacon, etc)
Instructions
- Preheat the oven to 450°F.
- Wash and dry the potatoes.
- Place two chopsticks* along the sides of a potato: these will act as guides to prevent cutting all the way through. Slice a potato into 1/8th-inch slices, being careful not to go all the way through to the bottom using the guides. Pay special attention to the ends of the potatoes that need a shallow cut: the guides won’t help here! Repeat for each potato.
- Place the potatoes on a parchment or aluminum-foil lined baking sheet. Brush with 1 tablespoon of the olive oil.
- Bake for 60 minutes, until the potato slices are starting to separate. Remove the tray from the oven and brush it with the remaining 1 tablespoon olive oil. Evenly sprinkle with the ¾ teaspoon kosher salt.
- Return the potatoes to the oven and bake for 10 to 15 minutes (or less for smaller potatoes), until crispy, lightly browned, and easily pierced with a paring knife. Meanwhile, in a small saucepan, melt the butter. Stir in the garlic and Italian seasoning and remove from the heat.
- When the potatoes are done, remove them from the oven and brush with the melted seasoned butter, making sure to evenly distribute the seasonings that sink to the bottom. Gently fan the potatoes with one hand while sprinkling a bit of flaky sea salt over the potatoes. Garnish with parsley or chives and serve immediately.
Notes
*Don’t have chopsticks? You can use any similar-shaped items: pencils, wooden spoons, spatulas, etc.
- Category: Side dish
- Method: Baked
- Cuisine: Vegetables
- Diet: Vegetarian


If I was to do this with one potato would the cook time still be an hour and 15 minutes? Asking out of Curiosity because I only have one potato and don’t know what to make with it
Hi! Yes, the same cook time.
Just for clarification, I think the recipe steps might be 1-7, and not 6-12.
I like the recipe and your tip to avoid cutting all of the way through the potatoes.
BTW Next time you go to an Asian restaurant, ask for “cheater” chopsticks. Some restaurants have these that are in the shape of a big plastic “U” with the “chopsticks” parallel with about 1″+ space between them. This keeps the chopsticks from rolling out from under the potatoes while slicing. Slick!!
Thanks for the tip!
I have a question about reheating. I’d like to make these a day in advance, and I think the best way would be to cook for the hour with the olive oil and salt, but withhold the final butter brush. Wrap tightly for a day, then reheat at 350 for about an hour or so, performing the final butter brush before serving.
Does that sound right? Have you tried cooking in advance and reheating? Any suggestions?
Thanks so much! I’m looking forward to making these.
I think that would work. I’d try a little warmer and shorter for the reheat, maybe 400 for 20 minutes?
Hi there! Nice tip about the cheater chopsticks! We’re not seeing where it says recipe steps 6-12 — we’ve tested it on a few different browsers and we see it as 1-7. Can you let us know what browser and device you are using (phone or computer)?
I’m seeing 6 through 12 also. I’m using Firefox/Windows11/desktop environment.
BTW: excellent recipe!